[Flutter]初识动画Animation
初始动画Animation,我们应该了解的知识:
- 在Flutter中有哪些类型的动画?
- 如何使用动画库中的基础类给widget添加动画?
- 如何为动画添加监听器?
- 该什么时候使用AnimatedWidget与AnimatedBuilder?
- 如何使用Hero动画?
精心设计的动画会让应用界面感觉更直观、流畅,能改善用户体验。 Flutter的动画支持可以轻松实现各种动画类型。各种widget,特别是Material Design widgets, 都带有在其设计规范中定义的标准动画效果,但也可以自定义这些效果。
在Flutter中有哪些类型的动画?
在Flutter中动画分为两类:基于tween或基于物理的。
- 补间(Tween)动画:在补间动画中,定义了开始点和结束点、时间线以及定义转换时间和速度的曲线。然后由框架计算如何从开始点过渡到结束点。
- 基于物理的动画:在基于物理的动画中,运动被模拟为与真实世界的行为相似。例如,当你掷球时,它在何处落地,取决于抛球速度有多快、球有多重、距离地面有多远。 类似地,将连接在弹簧上的球落下(并弹起)与连接到绳子上的球放下的方式也是不同。
如何使用动画库中的基础类给widget添加动画?
在为widget添加动画之前,先让我们认识下动画的几个朋友:
- Animation:是Flutter动画库中的一个核心类,它生成指导动画的值;
- CurvedAnimation:Animation的一个子类,将过程抽象为一个非线性曲线;
- AnimationController:Animation的一个子类,用来管理Animation;
- Tween:在正在执行动画的对象所使用的数据范围之间生成值。例如,Tween可生成从红到蓝之间的色值,或者从0到255;
Animation
在Flutter中,Animation对象本身和UI渲染没有任何关系。Animation是一个抽象类,它拥有其当前值和状态(完成或停止)。其中一个比较常用的Animation类是Animation<double>。
Flutter中的Animation对象是一个在一段时间内依次生成一个区间之间值的类。Animation对象的输出可以是线性的、曲线的、一个步进函数或者任何其他可以设计的映射。 根据Animation对象的控制方式,动画可以反向运行,甚至可以在中间切换方向。
- Animation还可以生成除double之外的其他类型值,如:
Animation<Color>或Animation<Size>; - Animation对象有状态。可以通过访问其value属性获取动画的当前值;
- Animation对象本身和UI渲染没有任何关系;
CurvedAnimation
CurvedAnimation将动画过程定义为一个非线性曲线。
final CurvedAnimation curve =
    new CurvedAnimation(parent: controller, curve: Curves.easeIn);
注: Curves 类定义了许多常用的曲线,也可以创建自己的,例如:
class ShakeCurve extends Curve {
  @override
  double transform(double t) {
    return math.sin(t * math.PI * 2);
  }
}
AnimationController
AnimationController是一个特殊的Animation对象,在屏幕刷新的每一帧,就会生成一个新的值。默认情况下,AnimationController在给定的时间段内会线性的生成从0.0到1.0的数字。 例如,下面代码创建一个Animation对象:
final AnimationController controller = new AnimationController(
duration: const Duration(milliseconds: 2000), vsync: this);AnimationController派生自Animation<double>,因此可以在需要Animation对象的任何地方使用。 但是,AnimationController具有控制动画的其他方法:
forward():启动动画;reverse({double from}):倒放动画;reset():重置动画,将其设置到动画的开始位置;stop({ bool canceled = true }):停止动画;
当创建一个AnimationController时,需要传递一个vsync参数,存在vsync时会防止屏幕外动画消耗不必要的资源,可以将stateful对象作为vsync的值。
注意: 在某些情况下,值(position,值动画的当前值)可能会超出AnimationController的0.0-1.0的范围。例如,fling()函数允许您提供速度(velocity)、力量(force)、position(通过Force对象)。位置(position)可以是任何东西,因此可以在0.0到1.0范围之外。 CurvedAnimation生成的值也可以超出0.0到1.0的范围。根据选择的曲线,CurvedAnimation的输出可以具有比输入更大的范围。例如,Curves.elasticIn等弹性曲线会生成大于或小于默认范围的值。
Tween
默认情况下,AnimationController对象的范围从0.0到1.0。如果您需要不同的范围或不同的数据类型,则可以使用Tween来配置动画以生成不同的范围或数据类型的值。例如,以下示例,Tween生成从-200.0到0.0的值:
final Tween doubleTween = new Tween<double>(begin: -200.0, end: 0.0);Tween是一个无状态(stateless)对象,需要begin和end值。Tween的唯一职责就是定义从输入范围到输出范围的映射。输入范围通常为0.0到1.0,但这不是必须的。
Tween继承自Animatable<T>,而不是继承自Animation<T>。Animatable与Animation相似,不是必须输出double值。例如,ColorTween指定两种颜色之间的过渡。
final Tween colorTween =
new ColorTween(begin: Colors.transparent, end: Colors.black54);Tween对象不存储任何状态。相反,它提供了evaluate(Animation<double> animation)方法将映射函数应用于动画当前值。 Animation对象的当前值可以通过value()方法取到。evaluate函数还执行一些其它处理,例如分别确保在动画值为0.0和1.0时返回开始和结束状态。
Tween.animate
要使用Tween对象,可调用它的animate()方法,传入一个控制器对象。例如,以下代码在500毫秒内生成从0到255的整数值。
final AnimationController controller = new AnimationController(
    duration: const Duration(milliseconds: 500), vsync: this);
Animation<int> alpha = new IntTween(begin: 0, end: 255).animate(controller);注意animate()返回的是一个Animation,而不是一个Animatable。
以下示例构建了一个控制器、一条曲线和一个Tween:
final AnimationController controller = new AnimationController(
    duration: const Duration(milliseconds: 500), vsync: this);
final Animation curve =
    new CurvedAnimation(parent: controller, curve: Curves.easeOut);
Animation<int> alpha = new IntTween(begin: 0, end: 255).animate(curve);
为widget添加动画
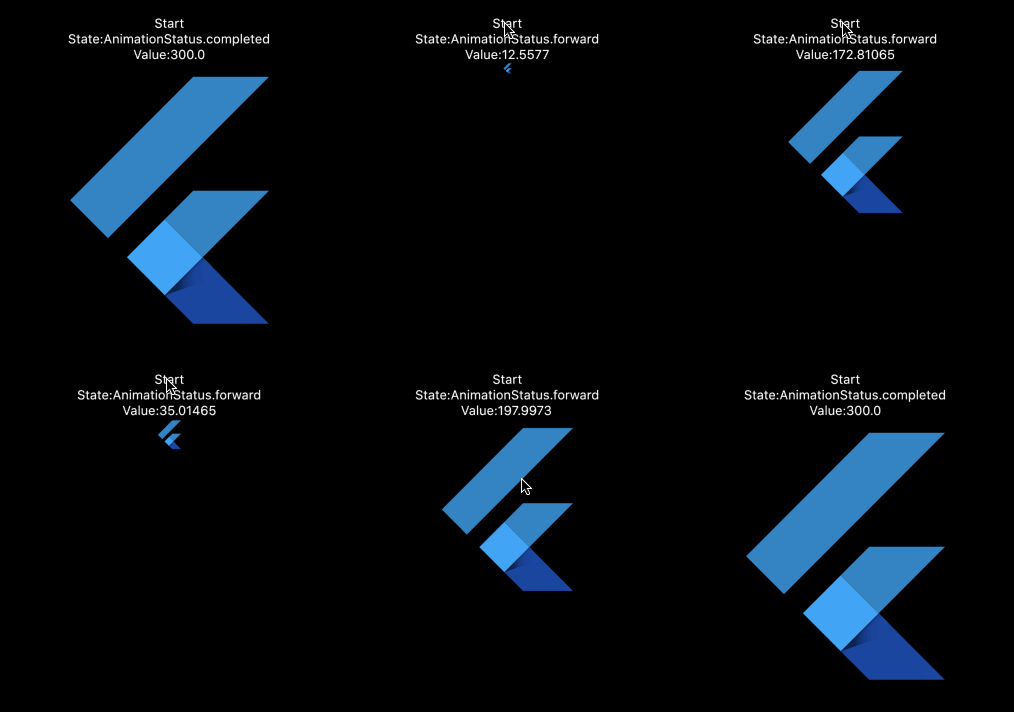
在下面的实例中我们为一个logo添加了一个从小放大的动画:
import 'package:flutter/material.dart';

void main() => runApp(LogoApp());

class LogoApp extends StatefulWidget {
  _LogoAppState createState() => _LogoAppState();
}

class _LogoAppState extends State<LogoApp> with SingleTickerProviderStateMixin {
  Animation<double> animation;
  AnimationController controller;
  AnimationStatus animationState;
  double animationValue;

  @override
  void initState() {
    super.initState();
    controller =
        AnimationController(duration: const Duration(seconds: 2), vsync: this);
    // #docregion addListener
    animation = Tween<double>(begin: 0, end: 300).animate(controller)
      ..addListener(() {
        // #enddocregion addListener
        setState(() {
          animationValue = animation.value;
        });
        // #docregion addListener
      })
      ..addStatusListener((AnimationStatus state) {
        setState(() {
          animationState = state;
        });
      });
    // #enddocregion addListener
  }

  @override
  Widget build(BuildContext context) {
    return Container(
      margin: EdgeInsets.only(top: 50),
      child: Column(
        children: <Widget>[
          GestureDetector(
            onTap: () {
              controller.reset();
              controller.forward();
            },
            child: Text('Start', textDirection: TextDirection.ltr),
          ),
          Text('State:' + animationState.toString(),
              textDirection: TextDirection.ltr),
          Text('Value:' + animationValue.toString(),
              textDirection: TextDirection.ltr),
          Container(
            height: animation.value,
            width: animation.value,
            child: FlutterLogo(),
          ),
        ],
      ),
    );
  }

  @override
  void dispose() {
    controller.dispose();
    super.dispose();
  }
}
注意,在上述代码中要实现这个动画的关键一步是在addListener()的回调中添加setState的调用这样才能触发页面重新渲染,动画才能有效,另外也可以通过AnimatedWidget来实现。
如何为动画添加监听器?
有时我们需要知道动画执行的进度和状态,在Flutter中我们可以通过Animation的addListener与addStatusListener方法为动画添加监听器:
- addListener:动画的值发生变化时被调用;
- addStatusListener:动画状态发生变化时被调用;
@override
  void initState() {
    super.initState();
    controller =
        AnimationController(duration: const Duration(seconds: 2), vsync: this);
    animation = Tween<double>(begin: 0, end: 300).animate(controller)
      // #enddocregion print-state
      ..addStatusListener((status) {
        if (status == AnimationStatus.completed) {
          controller.reverse();
        } else if (status == AnimationStatus.dismissed) {
          controller.forward();
        }
      })
      // #docregion print-state
      ..addStatusListener((state) => print('$state'));
      ..addListener(() {
        // #enddocregion addListener
        setState(() {
          // The state that has changed here is the animation object’s value.
        });
        // #docregion addListener
      });
    controller.forward();
  }
用AnimatedWidget与AnimatedBuilder简化和重构我们对动画的使用
什么是AnimatedWidget?
我们可以将AnimatedWidget理解为Animation的助手,使用它可以简化我们对动画的使用,在上面的示例widget添加动画的学习中我们不难发现,在不使用AnimatedWidget的情况下需要手动调用动画的addListener()并在回调中添加setState才能看到动画效果,AnimatedWidget将为我们简化这一操作。
在下面的重构示例中,LogoApp现在继承自AnimatedWidget而不是StatefulWidget。AnimatedWidget在绘制时使用动画的当前值。LogoApp仍然管理着AnimationController和Tween。
// Demonstrate a simple animation with AnimatedWidget

import 'package:flutter/animation.dart';
import 'package:flutter/material.dart';

class AnimatedLogo extends AnimatedWidget {
  AnimatedLogo({Key key, Animation<double> animation})
      : super(key: key, listenable: animation);

  Widget build(BuildContext context) {
    final Animation<double> animation = listenable;
    return new Center(
      child: new Container(
        margin: new EdgeInsets.symmetric(vertical: 10.0),
        height: animation.value,
        width: animation.value,
        child: new FlutterLogo(),
      ),
    );
  }
}

class LogoApp extends StatefulWidget {
  _LogoAppState createState() => new _LogoAppState();
}

class _LogoAppState extends State<LogoApp> with SingleTickerProviderStateMixin {
  AnimationController controller;
  Animation<double> animation;

  initState() {
    super.initState();
    controller = new AnimationController(
        duration: const Duration(milliseconds: 2000), vsync: this);
    animation = new Tween(begin: 0.0, end: 300.0).animate(controller);
    controller.forward();
  }

  Widget build(BuildContext context) {
    return new AnimatedLogo(animation: animation);
  }

  dispose() {
    controller.dispose();
    super.dispose();
  }
}

void main() {
  runApp(new LogoApp());
}
什么是AnimatedBuilder?
AnimatedBuilder是用于构建动画的通用widget,AnimatedBuilder对于希望将动画作为更大构建函数的一部分包含在内的更复杂的widget时非常有用,其实你可以这样理解:AnimatedBuilder是拆分动画的一个工具类,借助它我们可以将动画和widget进行分离:
在上面的实例中我们的代码存在的一个问题: 更改动画需要更改显示logo的widget。更好的解决方案是将职责分离:
- 显示logo
- 定义Animation对象
- 渲染过渡效果
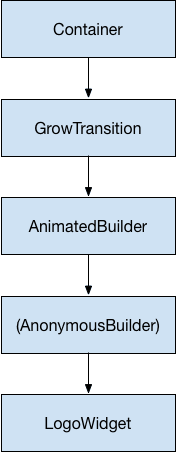
接下来我们就借助AnimatedBuilder类来完成此分离。AnimatedBuilder是渲染树中的一个独立的类, 与AnimatedWidget类似,AnimatedBuilder自动监听来自Animation对象的通知,不需要手动调用addListener()。
我们根据下图的 widget 树来创建我们的代码:
import 'package:flutter/animation.dart';
import 'package:flutter/material.dart';

void main() => runApp(LogoApp());

// #docregion LogoWidget
class LogoWidget extends StatelessWidget {
  // Leave out the height and width so it fills the animating parent
  Widget build(BuildContext context) => Container(
        margin: EdgeInsets.symmetric(vertical: 10),
        child: FlutterLogo(),
      );
}
// #enddocregion LogoWidget

// #docregion GrowTransition
class GrowTransition extends StatelessWidget {
  GrowTransition({this.child, this.animation});

  final Widget child;
  final Animation<double> animation;

  Widget build(BuildContext context) => Center(
        child: AnimatedBuilder(
            animation: animation,
            builder: (context, child) => Container(
                  height: animation.value,
                  width: animation.value,
                  child: child,
                ),
            child: child),
      );
}
// #enddocregion GrowTransition

class LogoApp extends StatefulWidget {
  _LogoAppState createState() => _LogoAppState();
}

// #docregion print-state
class _LogoAppState extends State<LogoApp> with SingleTickerProviderStateMixin {
  Animation<double> animation;
  AnimationController controller;

  @override
  void initState() {
    super.initState();
    controller =
        AnimationController(duration: const Duration(seconds: 2), vsync: this);
    animation = Tween<double>(begin: 0, end: 300).animate(controller);
    controller.forward();
  }
  // #enddocregion print-state

  @override
  Widget build(BuildContext context) => GrowTransition(
        child: LogoWidget(),
        animation: animation,
      );

  @override
  void dispose() {
    controller.dispose();
    super.dispose();
  }
  // #docregion print-state
}
如何使用Hero动画?
什么是Hero动画?


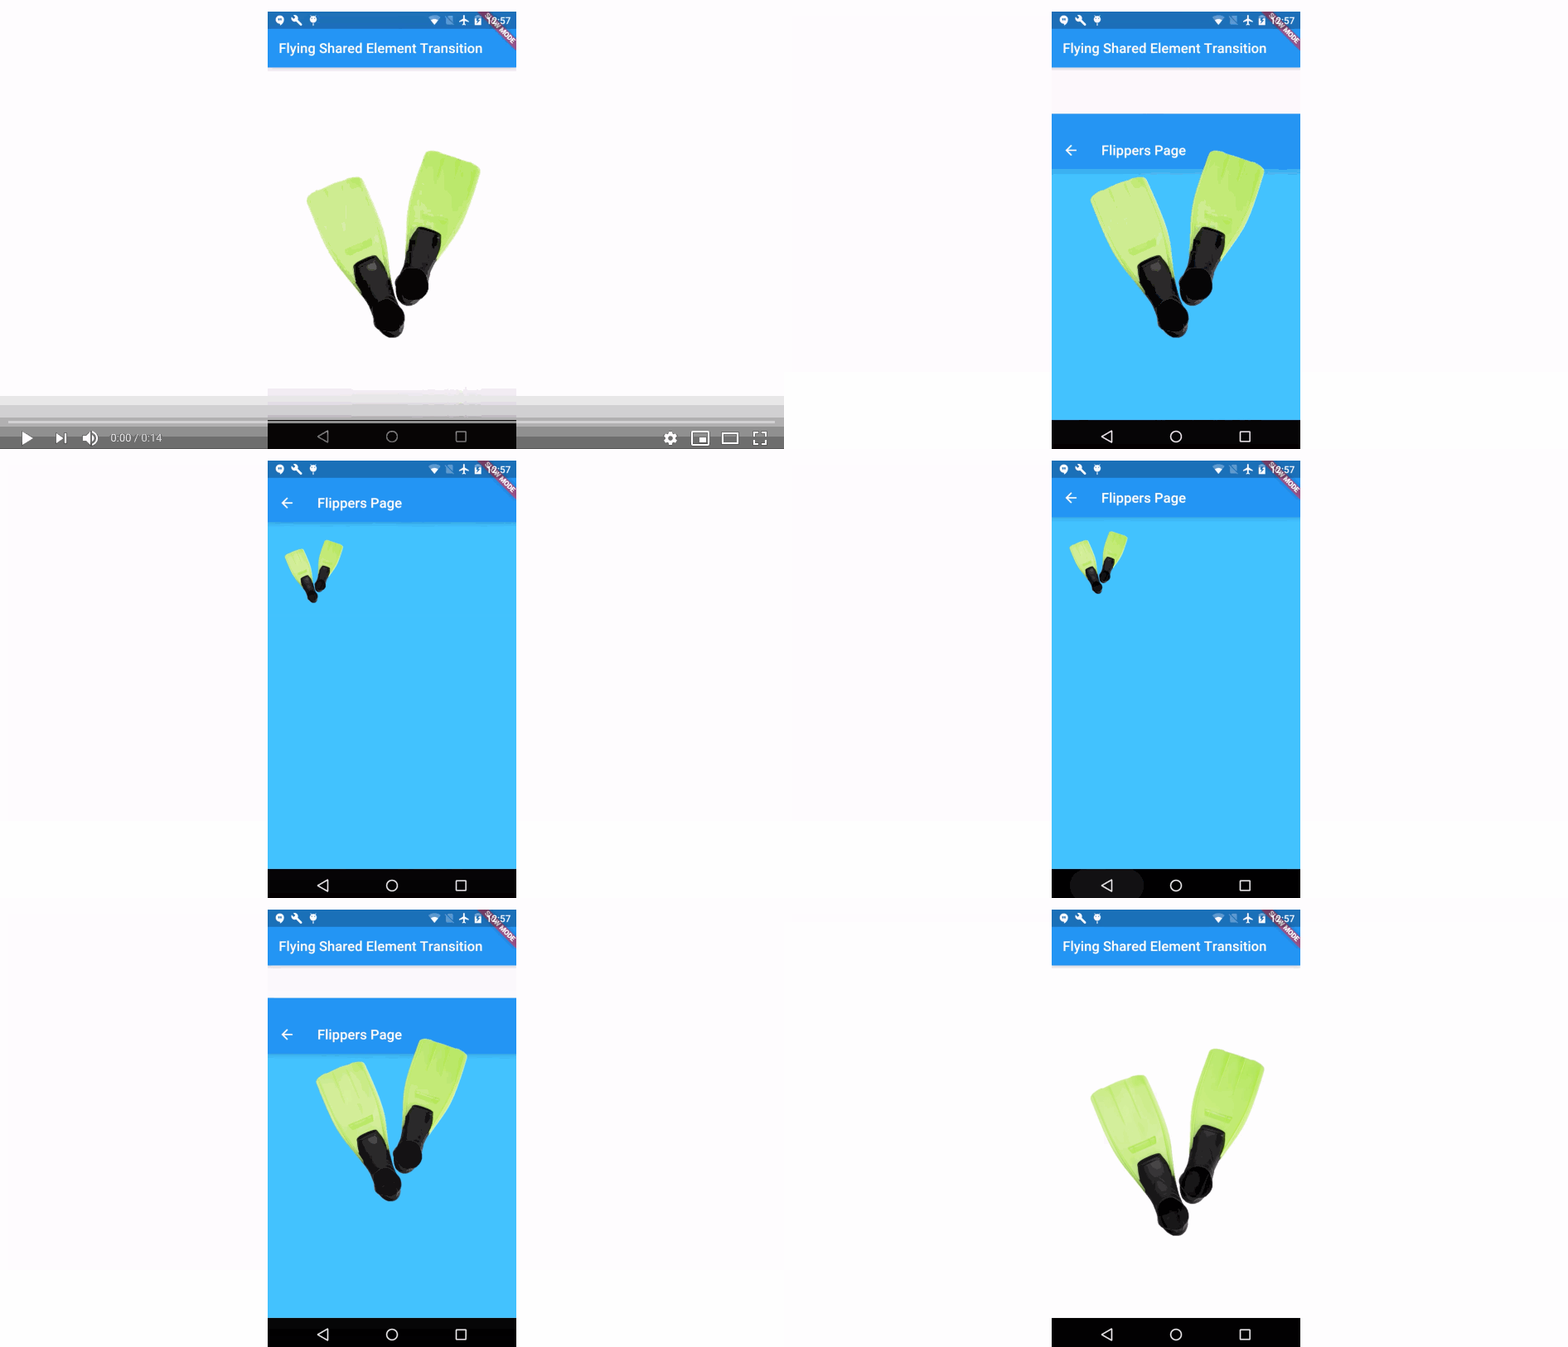
在 Flutter中可以用 Hero widget创建这个动画。当 hero 通过动画从源页面飞到目标页面时,目标页面逐渐淡入视野。通常, hero 是用户界面的一小部分,如图片,它通常在两个页面都有。从用户的角度来看, hero 在页面之间“飞翔”。接下来我们一起来学习如何创建Hero动画:
实现标准hero动画
import 'package:flutter/material.dart';
import 'package:flutter/scheduler.dart' show timeDilation;

class PhotoHero extends StatelessWidget {
  const PhotoHero({ Key key, this.photo, this.onTap, this.width }) : super(key: key);

  final String photo;
  final VoidCallback onTap;
  final double width;

  Widget build(BuildContext context) {
    return SizedBox(
      width: width,
      child: Hero(
        tag: photo,
        child: Material(
          color: Colors.transparent,
          child: InkWell(
            onTap: onTap,
            child: Image.network(
              photo,
              fit: BoxFit.contain,
            ),
          ),
        ),
      ),
    );
  }
}

class HeroAnimation extends StatelessWidget {
  Widget build(BuildContext context) {
    timeDilation = 10.0; // 1.0 means normal animation speed.

    return Scaffold(
      appBar: AppBar(
        title: const Text('Basic Hero Animation'),
      ),
      body: Center(
        child: PhotoHero(
          photo: 'https://raw.githubusercontent.com/flutter/website/master/examples/_animation/hero_animation/images/flippers-alpha.png',
          width: 300.0,
          onTap: () {
            Navigator.of(context).push(MaterialPageRoute<void>(
                builder: (BuildContext context) {
                  return Scaffold(
                    appBar: AppBar(
                      title: const Text('Flippers Page'),
                    ),
                    body: Container(
                      // Set background to blue to emphasize that it's a new route.
                      color: Colors.lightBlueAccent,
                      padding: const EdgeInsets.all(16.0),
                      alignment: Alignment.topLeft,
                      child: PhotoHero(
                        photo: 'https://raw.githubusercontent.com/flutter/website/master/examples/_animation/hero_animation/images/flippers-alpha.png',
                        width: 100.0,
                        onTap: () {
                          Navigator.of(context).pop();
                        },
                      ),
                    ),
                  );
                }
            ));
          },
        ),
      ),
    );
  }
}

void main() {
  runApp(MaterialApp(home: HeroAnimation()));
}
Hero的函数原型
const Hero({
    Key key,
    @required this.tag,
    this.createRectTween,
    this.flightShuttleBuilder,
    this.placeholderBuilder,
    this.transitionOnUserGestures = false,
    @required this.child,
  }) : assert(tag != null),
       assert(transitionOnUserGestures != null),
       assert(child != null),
       super(key: key);
- tag:[必须]用于关联两个Hero动画的标识;
- createRectTween:[可选]定义目标Hero的边界,在从起始位置到目的位置的“飞行”过程中该如何变化;
- child:[必须]定义动画所呈现的widget;
实现径向hero动画
import 'dart:math' as math;

import 'package:flutter/material.dart';
import 'package:flutter/scheduler.dart' show timeDilation;

class Photo extends StatelessWidget {
  Photo({ Key key, this.photo, this.color, this.onTap }) : super(key: key);

  final String photo;
  final Color color;
  final VoidCallback onTap;

  Widget build(BuildContext context) {
    return Material(
      // Slightly opaque color appears where the image has transparency.
      color: Theme.of(context).primaryColor.withOpacity(0.25),
      child: InkWell(
        onTap: onTap,
        child: LayoutBuilder(
          builder: (BuildContext context, BoxConstraints size) {
            return Image.network(
              photo,
              fit: BoxFit.contain,
            );
          },
        ),
      ),
    );
  }
}

class RadialExpansion extends StatelessWidget {
  RadialExpansion({
    Key key,
    this.maxRadius,
    this.child,
  }) : clipRectSize = 2.0 * (maxRadius / math.sqrt2),
        super(key: key);

  final double maxRadius;
  final clipRectSize;
  final Widget child;

  @override
  Widget build(BuildContext context) {
    return ClipOval(
      child: Center(
        child: SizedBox(
          width: clipRectSize,
          height: clipRectSize,
          child: ClipRect(
            child: child,
          ),
        ),
      ),
    );
  }
}

class RadialExpansionDemo extends StatelessWidget {
  static const double kMinRadius = 32.0;
  static const double kMaxRadius = 128.0;
  static const opacityCurve = const Interval(0.0, 0.75, curve: Curves.fastOutSlowIn);

  static RectTween _createRectTween(Rect begin, Rect end) {
    return MaterialRectCenterArcTween(begin: begin, end: end);
  }

  static Widget _buildPage(BuildContext context, String imageName, String description) {
    return Container(
      color: Theme.of(context).canvasColor,
      child: Center(
        child: Card(
          elevation: 8.0,
          child: Column(
            mainAxisSize: MainAxisSize.min,
            children: [
              SizedBox(
                width: kMaxRadius * 2.0,
                height: kMaxRadius * 2.0,
                child: Hero(
                  createRectTween: _createRectTween,
                  tag: imageName,
                  child: RadialExpansion(
                    maxRadius: kMaxRadius,
                    child: Photo(
                      photo: imageName,
                      onTap: () {
                        Navigator.of(context).pop();
                      },
                    ),
                  ),
                ),
              ),
              Text(
                description,
                style: TextStyle(fontWeight: FontWeight.bold),
                textScaleFactor: 3.0,
              ),
              const SizedBox(height: 16.0),
            ],
          ),
        ),
      ),
    );
  }

  Widget _buildHero(BuildContext context, String imageName, String description) {
    return Container(
      width: kMinRadius * 2.0,
      height: kMinRadius * 2.0,
      child: Hero(
        createRectTween: _createRectTween,
        tag: imageName,
        child: RadialExpansion(
          maxRadius: kMaxRadius,
          child: Photo(
            photo: imageName,
            onTap: () {
              Navigator.of(context).push(
                PageRouteBuilder<void>(
                  pageBuilder: (BuildContext context, Animation<double> animation, Animation<double> secondaryAnimation) {
                    return AnimatedBuilder(
                        animation: animation,
                        builder: (BuildContext context, Widget child) {
                          return Opacity(
                            opacity: opacityCurve.transform(animation.value),
                            child: _buildPage(context, imageName, description),
                          );
                        }
                    );
                  },
                ),
              );
            },
          ),
        ),
      ),
    );
  }

  @override
  Widget build(BuildContext context) {
    timeDilation = 5.0; // 1.0 is normal animation speed.

    return Scaffold(
      appBar: AppBar(
        title: const Text('Radial Transition Demo'),
      ),
      body: Container(
        padding: const EdgeInsets.all(32.0),
        alignment: FractionalOffset.bottomLeft,
        child: Row(
          mainAxisAlignment: MainAxisAlignment.spaceBetween,
          children: [
            _buildHero(context, 'https://raw.githubusercontent.com/flutter/website/master/examples/_animation/radial_hero_animation/images/chair-alpha.png', 'Chair'),
            _buildHero(context, 'https://raw.githubusercontent.com/flutter/website/master/examples/_animation/radial_hero_animation/images/binoculars-alpha.png', 'Binoculars'),
            _buildHero(context, 'https://raw.githubusercontent.com/flutter/website/master/examples/_animation/radial_hero_animation/images/beachball-alpha.png', 'Beach ball'),
          ],
        ),
      ),
    );
  }
}

void main() {
  runApp(MaterialApp(home: RadialExpansionDemo()));
}
